
Change file and folder permission by using an FTP client
FTP stands for “File Transfer Protocol” and it’s used to transfer the file between computers on a network. When using a web browser for an FTP connection, FTP uploads are sometimes very slow, and downloads are not protected (not recommended for uploading or downloading large files). FTP client used to upload and download the file is really easy. FTP clients have some extra features. For example, you’re can resume a download that did not finish successfully. This is a very nice feature for people with slower Internet connections.
FTP clients’ interface is generally divided into two – the pane on the left shows the files and folders on your computer (your Desktop, My Documents, etc,) and the pane on the right displays the files on the remote server (if this is your website hosting account, you will see the public_html folder, where the files of your site are stored).
FileZilla:
FileZilla is open source software distributed free of charge under the terms of the GNU General Public License.
FileZilla is one of the most popular FTP clients. The main purpose of Filezilla is to make it easy for you to upload and download files from your web hosting server. This FileZilla FTP client used to edit the files and save changes without the need for manually downloading and uploading and it supports Mac, Windows, and Linux.
The following steps used to change file and folder permission by using an FTP client
Step 1: Open the FTP client(FileZilla).
Step 2: Enter the hostname, username and password then click the quick connect.
Step 4: It shows the menu bar and click the File permission option
Step 5: Select the required permission in popup box and enter the Ok button
Step 1 Open the FTP client(FileZilla).
Step 2 Enter the hostname, username and password then click the quick connect.

Enter the required things and click the quick connect
Step 3 It connects to the server and shows the files/folders. To choose the required file/folder for changing the permission after right click the file/folder.

To right-click the required file/folder
Step 4 It shows the menu bar and clicks the File permission option.

Click the File permission option
Step 5 Select the required permission in popup box and enter the Ok button.
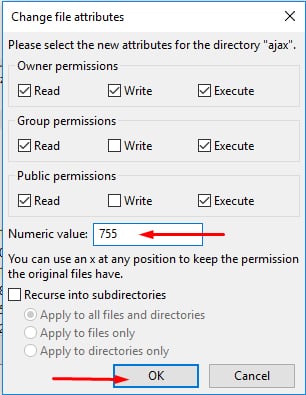
Click OK button